Settings
Settings is where you tell the system how your business runs — your company details, how money is shown, what prints on receipts, how the checkout behaves, and how the app talks to email and card payments. You set it up once and the whole system follows it.
Overview
The Settings page is a simple grid of cards. Each card opens one focused area where you change just those options and press Save. You don't need to understand every card — set up the few that matter to your shop and leave the rest on their sensible defaults.
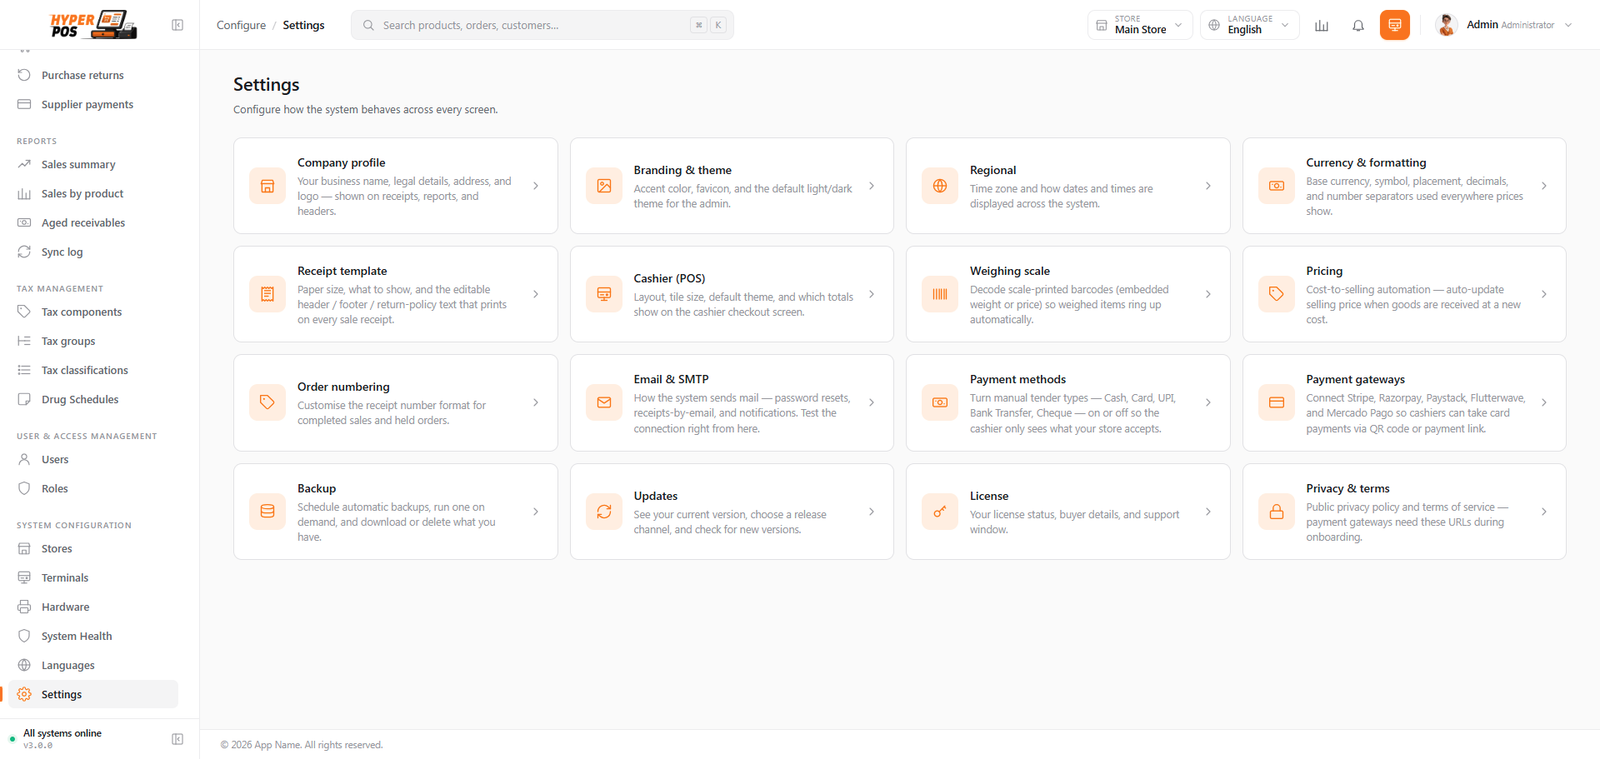
A few things people expect here actually live elsewhere in the sidebar: Users & Roles, Stores & Terminals, Hardware, Languages and Tax each have their own menu item. Settings covers the company-wide behaviour below.
Why it's useful
- Set it once, everywhere follows. Your currency, time zone, receipt text and number formats are applied consistently across every screen and printout.
- Make the system feel like yours. Your logo, brand colour and company details appear on receipts, reports and the app header.
- Only show what you accept. Turn payment types on or off so cashiers see exactly the options your store uses.
- Stay safe and current. Schedule backups, check for updates and confirm your licence — all from one place.
What's inside Settings
Here is every card on the Settings page, grouped to make them easy to find. Open the linked guide for the cards that have a full walkthrough.
Your business & branding
| Card | What it controls |
|---|---|
| Company profile | Your business name, legal details, address and logo — shown on receipts, reports and headers. |
| Branding & theme | Accent colour, favicon, and the default light/dark theme for the admin area. |
| Privacy & terms | Your public privacy policy and terms-of-service pages. (Card payment providers ask for these web addresses when you sign up.) |
Money & numbers
| Card | What it controls | Learn more |
|---|---|---|
| Regional | Your time zone and how dates and times are displayed across the system. | — |
| Currency & formatting | Base currency, symbol, where the symbol sits, number of decimals, and the separators used everywhere prices show. | — |
| Pricing | Choose product-based or batch-wise pricing, and control cost-to-selling automation when goods are received. | Batch-wise pricing |
| Numbering | The receipt-number format for completed sales and held orders, the pattern used for auto-generated product SKUs, and the prefix for in-store barcodes you generate for items with no manufacturer barcode. Each has a live preview. | Product codes |
| Loyalty points | Turn the rewards programme on, set how fast points are earned, what they're worth at the till, the limits on spending them, and when they expire. | Loyalty points |
Selling & receipts
| Card | What it controls | Learn more |
|---|---|---|
| Receipt template | Paper size, what to show, and the editable header / footer / return-policy text that prints on every sale receipt. | Hardware & printing |
| Cashier (POS) | Checkout layout, tile size, default theme, and which totals show on the cashier screen. | The POS screen |
| Weighing scale | Decode scale-printed barcodes (with the weight or price built in) so weighed items ring up automatically. | Weighed & scale items |
| Payment methods | Turn manual tenders on or off and create record-only methods such as Mobile Money, with a required customer transaction reference. | Custom payment methods |
| Payment gateways | Connect Stripe, Razorpay, Paystack, Flutterwave or Mercado Pago so cashiers can take card payments by QR code or payment link. | Taking payments |
| Use free Click-to-Chat or configure company/store Meta Cloud API connections, document templates, tests and delivery logs. | WhatsApp sharing | |
| Stock locations | Name the shelf coordinates your shop actually uses — aisle, rack, shelf, bin — and switch off the ones you don't, so staff can look up where a product is kept. | Shelf locations |
Allowing negative stock
Inside Cashier (POS) there's an option called Allow selling below available stock (overselling). Normally the till stops a cashier from selling more of a stock-tracked item than you have on hand. Turn this on and the checkout will let those sales through even when the count reaches zero or goes below it — handy for backorders or made-to-order goods you'll restock later.
- It's off by default. Nothing changes until you deliberately switch it on.
- It needs a permission too. Even with the option on, only staff whose role includes Sell below available stock can oversell — everyone else is still blocked. So it's really two switches: the company option and the person's permission.
- Items that don't track stock always sell. Services and made-to-order products aren't counted, so they ring up regardless of this option.
- Batch / expiry items are still protected. Products tracked by batch or expiry date can never be taken below zero, even when overselling is on.
Use this with care — your stock counts can go below zero. When a sale oversells, on-hand becomes a negative number until you receive more stock. That's expected for backorders, but it does mean your inventory reports can show minus figures. Leave this off unless you have a clear reason to allow it.
System & data
| Card | What it controls | Learn more |
|---|---|---|
| Email & SMTP | How the system sends mail — password resets, receipts by email, and notifications. You can test the connection right here. | — |
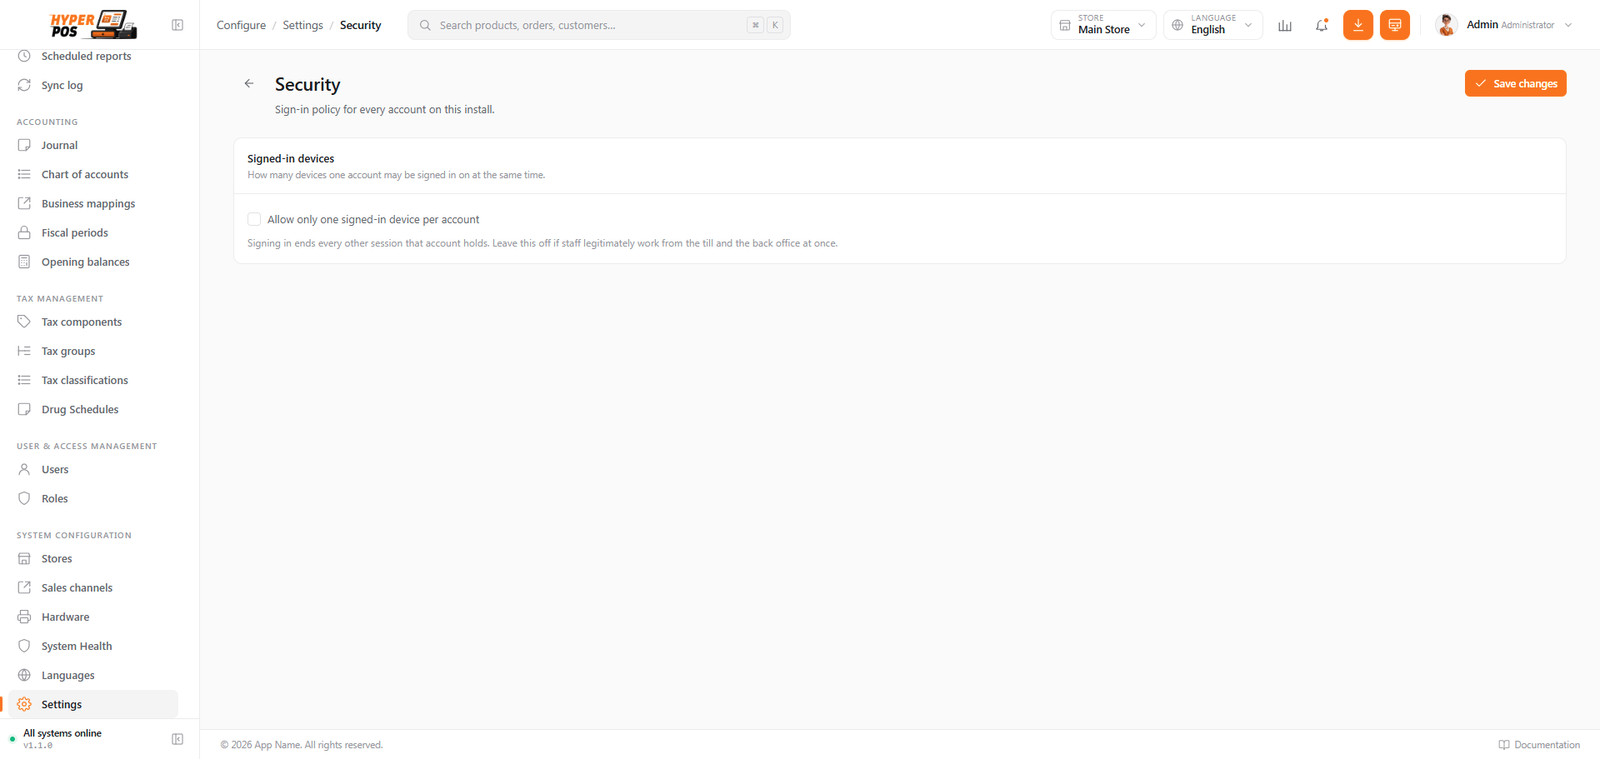
| Security | Optionally allow only one signed-in device per account. | Below |
| Header & footer scripts | Add trusted analytics, tag-manager, chat or tracking snippets with password confirmation and protected-page exclusions. | Below |
| Scheduler (cron job) | Set up the single background job that automatic backups, scheduled reports, low-stock alerts and points expiry all rely on — and prove it's really running. | Cron job setup |
| Backup | Schedule automatic backups, run one on demand, and download or delete the copies you have. | Backup & restore |
| Updates | See your current version, choose a release channel, and check for new versions. | Updates & license |
| License | Your licence status, buyer details, and support window. | Updates & license |
| System Health | A page of checks on your install — plus the one-off maintenance tools below. | Below |
Security: one signed-in device per account
Open Settings → Security and enable Allow only one signed-in device per account when staff accounts should never stay open on two devices. After it is enabled, a new sign-in ends every other session belonging to that same account; other users are unaffected.
This policy needs the database session driver. If the page shows a warning, set SESSION_DRIVER=database in the installation environment before relying on the switch. Leave the option off when one staff member legitimately uses the till and back office at the same time.
Trusted header & footer scripts
Super administrators can open Settings → Header & footer scripts to add complete, trusted analytics, tag-manager, chat or tracking snippets without editing application files.
- Paste complete trusted snippets
Add complete
<script>tags in Header or Footer. Tracking<noscript>fallbacks are supported; external sources must use HTTPS. - Choose the execution scope
Enable scripts for public pages. Leave Also run on authenticated admin and cashier pages off unless the trusted provider genuinely needs access to those pages.
- Confirm the security risk
Enter your current password and, when enabling, acknowledge that the code runs in visitors' browsers. Save.
- Test and keep a recovery path
Test on a harmless page first. This settings page never runs saved snippets, so a super administrator can return and disable broken code.
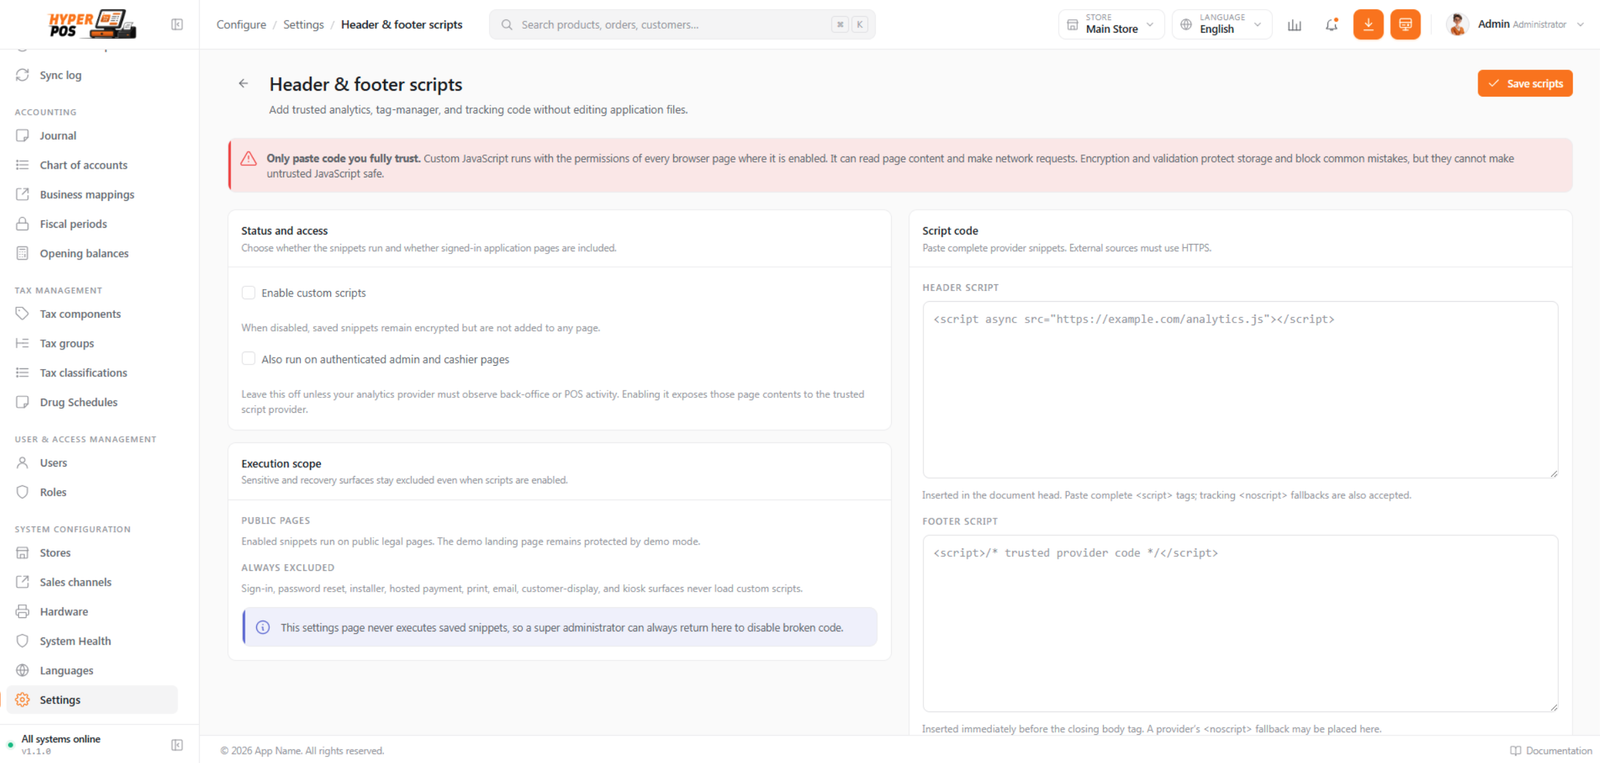
Custom JavaScript can read page content and make network requests. Validation and encrypted storage cannot make untrusted code safe. Sign-in, password reset, installer, hosted payment, print, email, customer-display and kiosk surfaces are always excluded.
System Health & one-off tools
Settings → System Health runs a set of checks on your installation — folder permissions, the database, whether the cron job is actually running — and shows each as OK, a warning, or a problem to fix. It's the first place to look if something feels off, and the first thing to screenshot if you contact support.
It also hosts a couple of one-off tools you'll use once and forget about:
| Tool | What it does |
|---|---|
| Rebuild historical sale costs | Older sales recorded before cost tracking existed show as 100% profit. This walks your stock history and works out what each item actually cost when it sold. Always Preview first — it shows what it would write and changes nothing until you confirm, and it never overwrites a cost that's already there. See Profit, cost and margin. |
| Clear sample data | Removes the demo records from a fresh install so you can start on real data. A backup is taken first, and your company, stores, users and settings are kept. |
How to change a setting
-
Open Settings
Click Settings at the bottom of the left sidebar.
-
Pick the card you need
Click the card for the area you want — for example Currency & formatting or Receipt template.
-
Make your changes
Edit the fields on that page. Many pages show a live preview so you can see the effect before saving.
-
Save
Click Save. The change takes effect across the system right away.
Tips & best practices
- Do Company profile, Regional and Currency first. They shape how everything else looks — get them right before you start selling.
- Test your email. After filling in Email & SMTP, use the built-in test so you know receipts and resets will actually send.
- Only switch on the payment methods you really take. A shorter list means a faster, cleaner checkout for cashiers.
- Turn on automatic backups. It's the cheapest insurance you'll ever buy — see Backup & restore.
Notes & warnings
Change your currency before you start trading. Switching base currency after you've recorded sales doesn't convert past figures — it only changes how new amounts are shown.
These settings are company-wide. Currency, time zone and number formats are shared by every store and terminal — they aren't set per location.
Related: Users & roles · Stores & terminals · Hardware & printing · Backup & restore · Updates & license