Languages
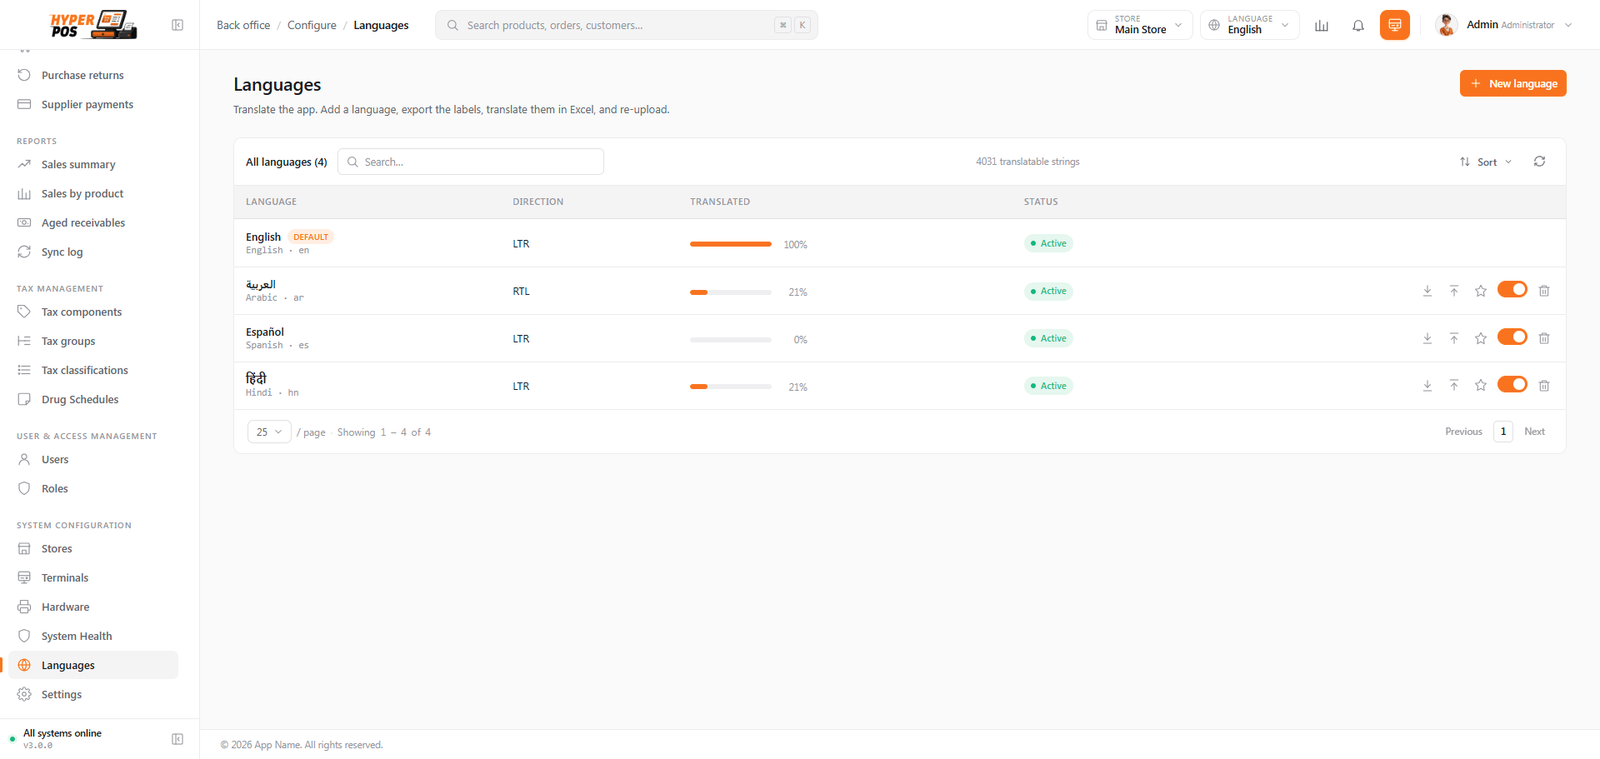
The system can speak more than one language, including right-to-left ones like Arabic, where the whole layout neatly flips direction. You can switch language with a click, and you can add or polish a translation yourself — no code, just a spreadsheet.
Overview
English comes ready and complete, and it's always there as the fallback. Alongside it, the system ships with a couple of example languages so you can see the switcher and right-to-left layout working straight away. You can add more languages, and translate them at your own pace — anything you haven't translated yet simply shows in English until you do, so nothing ever looks broken.
For right-to-left (RTL) languages — written from right to left, like Arabic, Hebrew, Urdu and Persian — the screen mirrors itself automatically: menus, buttons and text all face the correct way.
Why it's useful
- Your team works in their own language. Staff who are more comfortable in another language can use the system in it.
- Right-to-left just works. Choose an RTL language and the whole layout flips correctly — no fiddling.
- You're in control of the wording. Don't like a particular label? Change it via the translation file.
- Nothing breaks. Untranslated bits fall back to English, so a half-finished language is still perfectly usable.
Switching the language
There are two easy ways to change language:
- Use the language dropdown in the top bar to switch right away. Your choice is remembered for next time you log in.
- Set a default language for the whole business on the Languages page, so new people start in it.
Adding or editing a language, step by step
Translating is a simple spreadsheet round-trip: download a file, fill in one column, upload it back.
-
Open Languages
Click Languages in the sidebar. You'll see the languages you have and how complete each one is.
-
Add the language
Click Add language, give its name and pick its writing direction (left-to-right or right-to-left). Save it.
-
Export the translation file
Use Export on that language to download a spreadsheet. It lists every label, with the English wording beside an empty Translation column.
-
Fill in the translations
Open the file in Excel (or any spreadsheet tool) and type your translation next to each English phrase. You only edit the one column. Leave any row blank to keep the English for it.
-
Import it back
Use Import to upload your finished file. The system checks it, applies your wording, and tells you how many rows it accepted. Any odd rows are skipped and reported — your file can never break the app.
Tips & best practices
- Translate the busy screens first. The checkout and receipts are seen most, so they're the best place to start if you can't do it all at once.
- Edit only the Translation column. Leave the English reference alone — it's there to guide you.
- It's fine to stop and resume. Import as much as you've done; finish the rest later and import again.
- Use the percentage as a checklist. The "translated" figure on the list shows how far along each language is.
Notes & warnings
English can't be removed, and neither can your current default language. English is the safety net everything falls back to.
Import only the file you exported. Keep its layout intact and edit just the Translation column — that's all the system expects.
Related: General settings · Finding your way