Shelf locations
A shelf location records where a product physically sits in your shop — aisle A3, rack R-12, the fridge, the locked cabinet out back. Once it's recorded, anyone can find the item in seconds: it shows on the cashier screen, on your stock lists, on transfers and purchase deliveries, on printed labels, and on the count sheet you carry round the shop.
Overview
"Where do we keep the ibuprofen?" is one of the most common questions in any shop, and until now the answer lived in someone's head. A shelf location writes it down. You describe the spot using up to four coordinates — aisle, rack, shelf and bin — and POS shows that wherever the product appears.
Two things make it work in the real world:
- Locations are recorded per store. Branch A can keep a product on rack 12 while Branch B keeps it on rack 3, and each branch's staff see their own answer.
- A product can be kept in more than one place. A pharmacy might keep one SKU on the dispensing rack, another few boxes in the godown, some in the fridge, and the controlled stock in a locked cabinet. You can record all four.
One of those places is marked as the main spot — the shelf people pick from. That's the one that shows in the products list, on labels, and as the badge on the cashier screen; the rest are one tap away.
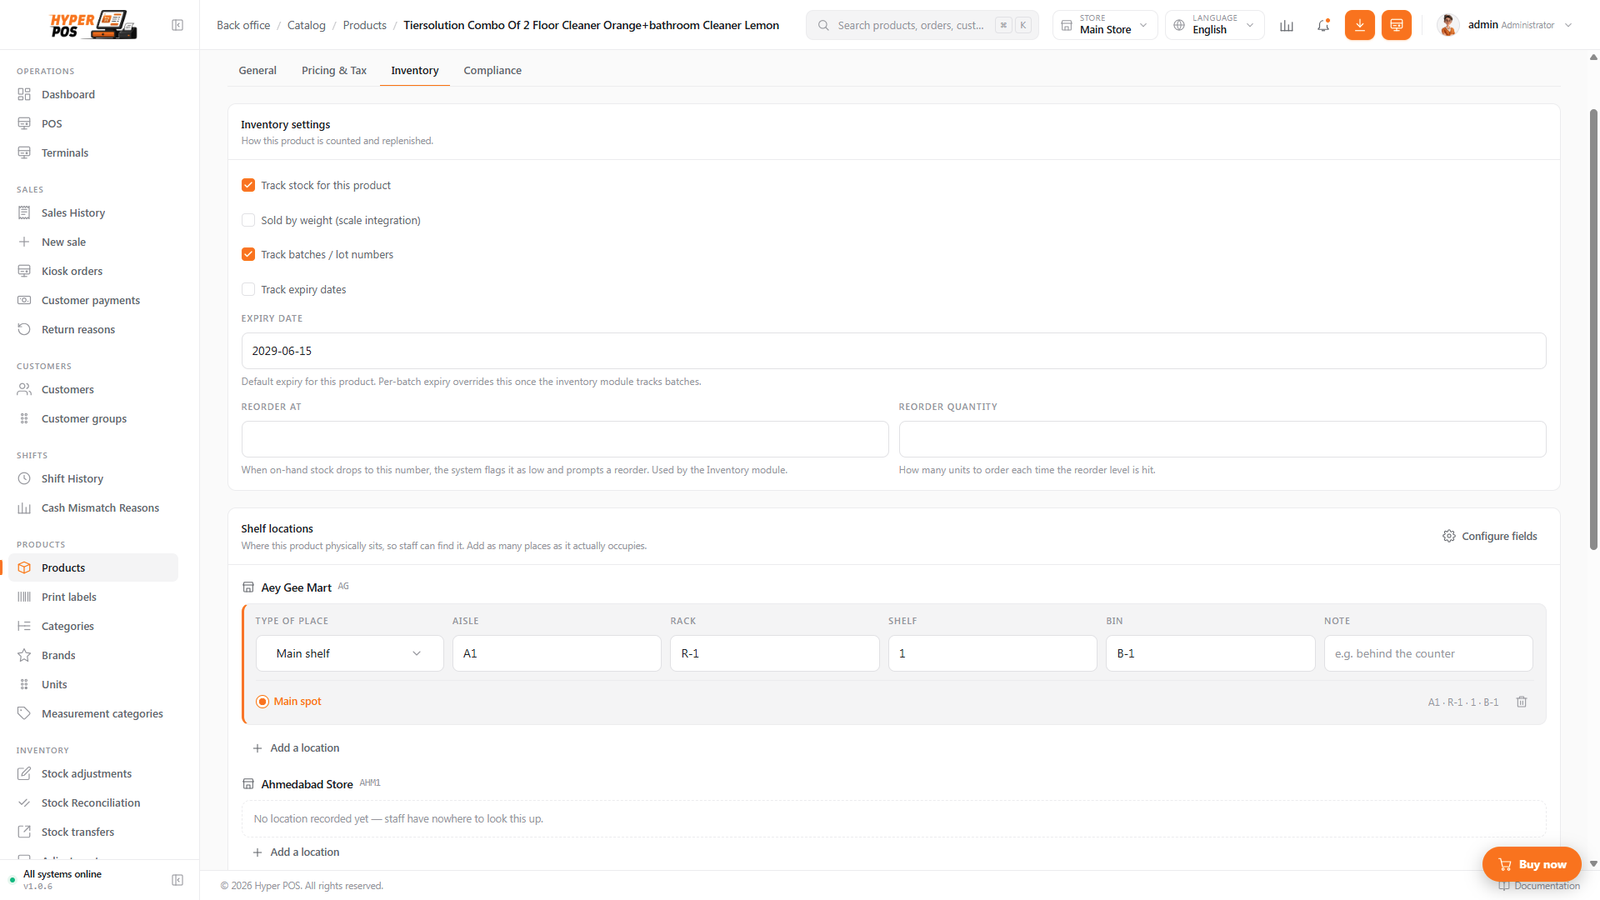
A location records where stock is kept — it does not hold a quantity. How much you have stays on the product's stock and batch records, exactly as before. So you'll never have to "move" stock between shelves to keep your numbers right.
Why it's useful
- New staff find things on day one. No more walking the aisles or asking the person who's been there longest.
- Deliveries get put away in the right place. Receiving a purchase shows each line's location, so the person unpacking knows where it belongs.
- Counts happen in walk order. The printable count sheet is grouped by location, so you count the shop the way you actually walk it — no criss-crossing.
- Expiry sweeps get quicker. The batches list shows where each batch lives, so pulling short-dated stock is one lap, not several.
- Customers get an answer at the counter. The cashier can see the location on the product tile without leaving the cart.
Recording a location, step by step
-
Open the product
Go to Products, open the item, and scroll to the Shelf locations section.
-
Add a location
Click Add a location and fill in the coordinates you use — for example Aisle
A3, RackR-12. You only fill the fields your shop actually uses; the rest can be switched off entirely (see Naming the fields). -
Say what kind of place it is
Pick a type of place — main shelf, back stock, refrigerated, locked cabinet, or other. This is how staff know whether they're being sent to the shop floor or the store room.
-
Mark the main spot
Tick Main spot on the shelf people pick from. Each store has exactly one — ticking a new one moves the mark off the old one.
-
Add a note if it helps
The optional Note field is for the bit that doesn't fit a coordinate — "behind the counter", "top shelf, needs the step stool".
-
Save
Save the product. The location appears immediately across the app — including on tills, which pick it up on their next sync.
The types of place
| Type | What it means |
|---|---|
| Main shelf | The shelf customers or staff pick from. Each store has one — it's what shows on labels and in the products list. |
| Back stock | Reserve stock kept out back — a godown, store room, or overflow rack. |
| Refrigerated | Fridge or cold-chain storage, for anything that must stay chilled. |
| Locked cabinet | Secured storage — controlled drugs, high-value items. |
| Other | Anywhere that doesn't fit the types above. |
Naming the fields to match your shop
Every shop describes its space differently. A supermarket says "aisle"; a pharmacy says "rack"; a warehouse says "bin". Go to Settings → Stock locations and you can:
- Turn fields on or off. Out of the box, Aisle and Rack are on and Shelf and Bin are off — so a small shop only ever sees two boxes to fill.
- Rename them. Call "Aisle" a Section, or "Bin" a Tray, and that name is used everywhere in the app.
Turning a field off only hides it. Anything already recorded is kept and comes straight back if you switch it on again. You must keep at least one field on, otherwise there'd be nothing to fill in.
Sort order is handled for you. POS sorts locations the way a human walks them, so A3 comes before A10 — not after it, the way plain alphabetical sorting would put it.
Setting locations in bulk
Typing a location into a few thousand products one at a time is nobody's idea of a good afternoon. From the Products list you can do a whole aisle at once:
-
Filter to the products you're placing
Filter by category, brand, supplier — whatever describes the shelf you're standing at. There's also a Location filter with Has a location and No location yet, which is how you find what's still missing.
-
Select the rows
Tick individual products, or tick the header box to take the whole page. If your filter matches more than one page, POS offers Select all … matching so you can apply to every matching product, not just the ones on screen.
-
Choose Set location
Fill in only the fields you want to change. Anything you leave blank keeps its current value — so you can stamp a new rack across 200 products without touching their aisles.
-
Apply
POS confirms how many products it updated. Very large runs are done in batches — if there's more to do it tells you, so you can narrow the filter and finish the rest.
Clear location works the same way and removes the main shelf location for the selected products at the current store. Back stock, refrigerated and locked-cabinet locations are deliberately left alone.
Bulk changes apply to the store you're currently working in. Check the store shown in the top bar before you apply — you don't want to stamp branch A's rack numbers onto branch B.
Importing locations from a spreadsheet
If you already keep a shelf map in Excel, import it. The product importer accepts location columns alongside everything else — map them in the wizard's column-matching step, and bare headers like Aisle, Rack or Bin are matched automatically.
| Column | What it sets |
|---|---|
Location — aisle | The aisle of the main shelf at your current store. |
Location — rack | The rack. |
Location — shelf | The shelf. |
Location — bin | The bin. |
Location — note | The free-text note. |
Blank cells are left alone, never blanked out — so re-importing a price list will not wipe the locations you've already entered. The same location columns come back out in a product export, which makes "export → fill in the gaps → re-import" a perfectly good way to map a whole shop.
Where locations show up
| Screen | What you see |
|---|---|
| The POS screen | A small location badge on the product tile and list row. Tap it to see every place that item is kept, without leaving the cart. It works offline too. |
| Products list | A Location column, plus a filter for products that still have none. |
| Stock levels & low stock | The location beside each row, so a re-order walk is a single lap of the shop. Included in the export. |
| Batches & expiry | Where each batch is kept — turning an expiry sweep into a walk list. Included in the export. |
| Stock reconciliation | A location column, a per-aisle filter, and the printable count sheet below. |
| Stock transfers | Both ends of the move: Pick from at the sending store and Put away at at the receiving store. |
| Receiving a purchase | A put-away hint on each line, so the delivery goes straight to the right shelf. |
| Barcode labels | An optional Shelf location field on the printed label (off by default). |
Every one of these screens shows the location for its own store — the transfer's source store, the stock take's store, the purchase order's store — never whichever store you happen to have selected in the top bar.
The printable count sheet
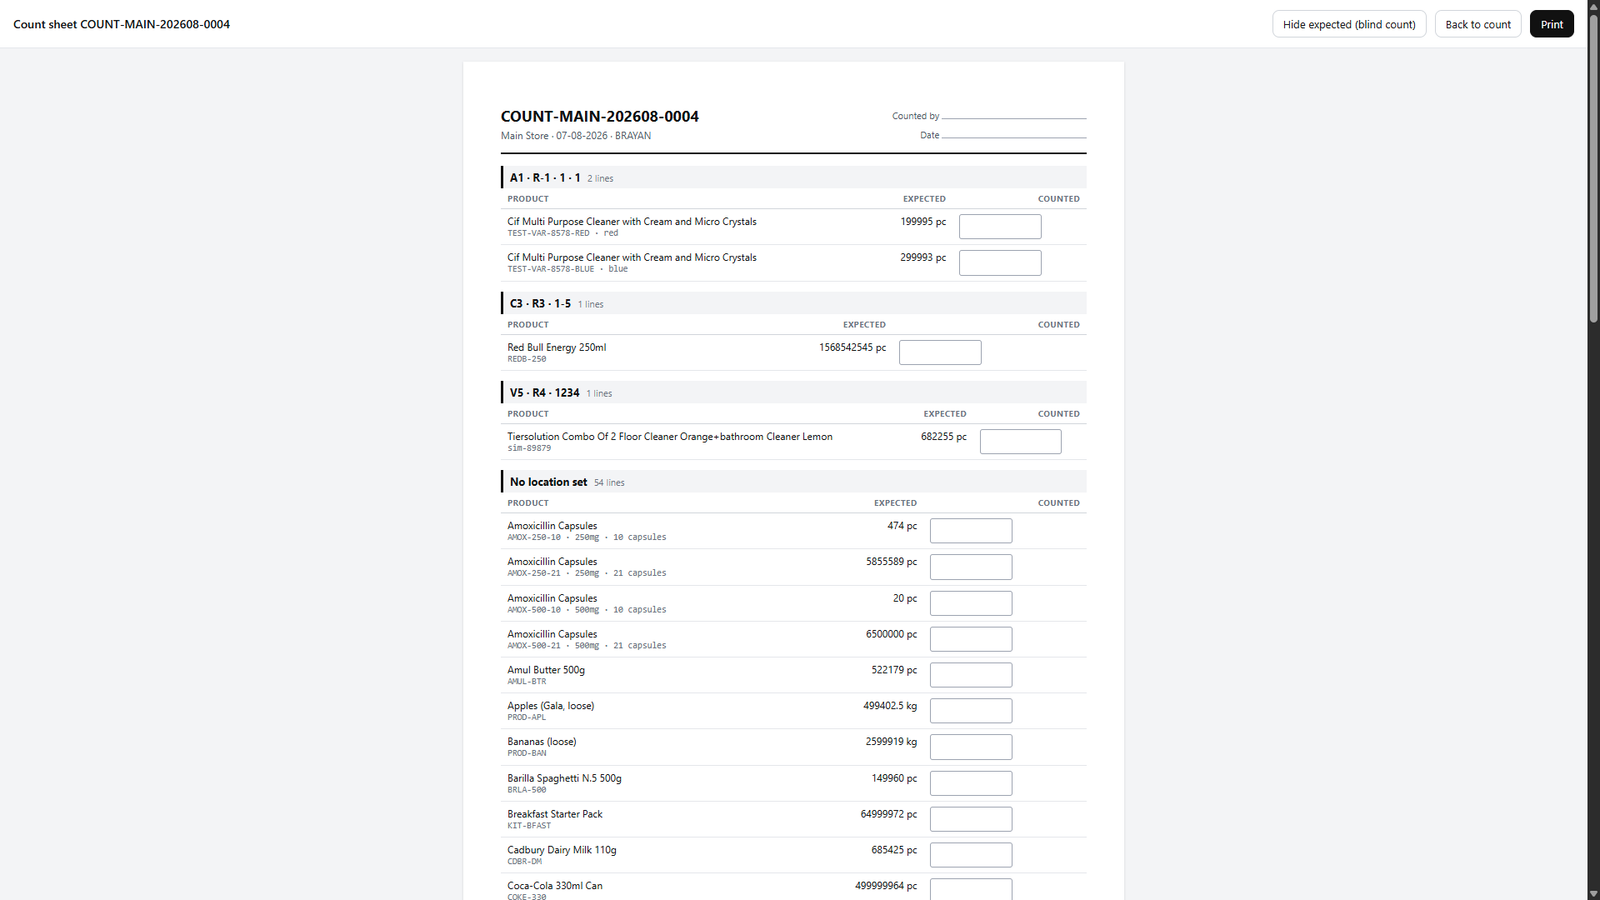
Open a stock take and choose Print count sheet. You get a clean, print-first page with the lines grouped by shelf location in walk order, so you count the shop in one pass instead of hunting up and down for the next product on the list. Items with no location yet are grouped together at the end under No location set — a handy to-do list.
There's a Hide expected (blind count) option on the sheet. A blind count hides what the system thinks you have, so whoever's counting writes down what they genuinely see rather than what they're expected to see. It's the honest way to run a count, and worth using for any count that matters.
Tips & best practices
- Decide your naming scheme first. Ten minutes agreeing that aisles are
A1…A9and racks areR-01…R-40saves re-typing the lot later. - Map the shop aisle by aisle. Filter the products list to one category, stand in the aisle, and bulk-set. A mid-size shop is an afternoon's work.
- Use the "No location yet" filter as your progress bar. When it's empty, you're done.
- Don't over-describe. Two coordinates people actually use beat four they don't. Switch off the fields you'll leave blank.
- Put the location on labels for the store room. It's off by default, but on back-stock labels it earns its space.
- Re-check after a re-merchandise. When you move a fixture, bulk-set the affected products the same day.
Notes & warnings
Locations don't hold stock. They tell you where to look, not how much is there. If you need per-shelf quantities, that's warehouse management — a different job from a shop's POS.
One main spot per store. Marking a new location as the main spot moves the mark off the previous one; it doesn't create a second pick face.
A location belongs to the product at a store, not to individual variants. Size- or colour-level bins aren't part of this version.
Editing a product only affects the stores you can see. Saving from one branch never disturbs another branch's shelf map.
Related: Products · Stock overview · Stock reconciliation · Barcode labels · Settings