Barcode labels
A barcode label is the small sticker on a product showing its name, price and a scannable barcode. Printing your own means every item on the shelf can be scanned at the till — even things that came without a barcode, like loose goods or your own-brand products.
/admin/products/labels.Overview
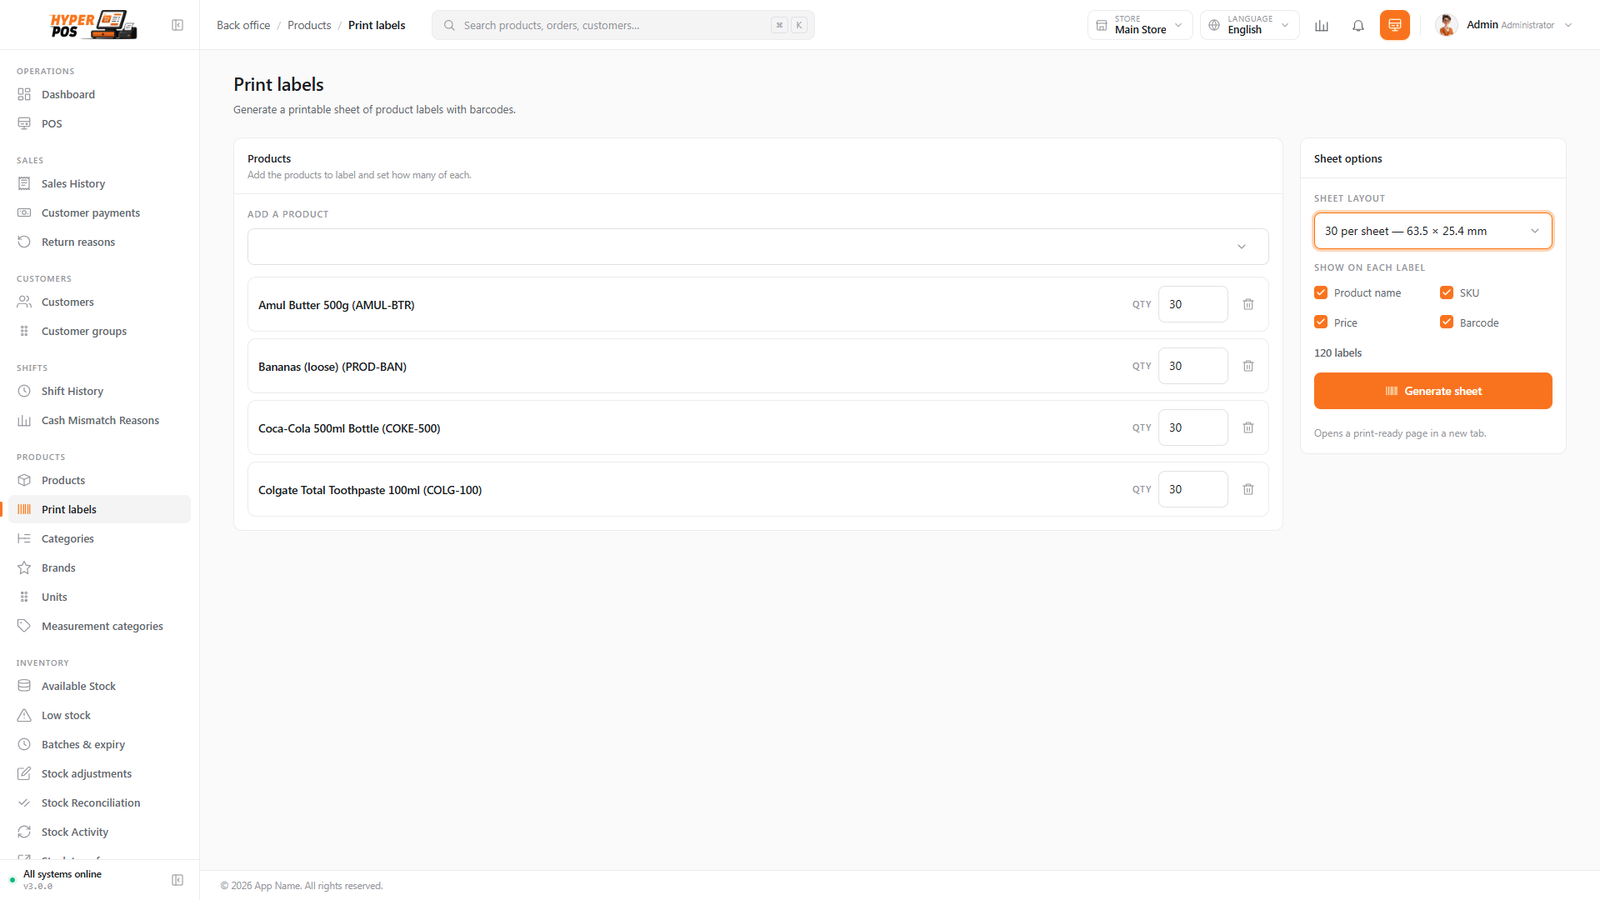
The label tool is a short wizard: you choose the products and how many labels you want of each, pick a layout (an A4 sheet of stickers, or a roll for a thermal label printer), then preview and print. You can reach it from the sidebar, or straight from the product list using the Print labels action on a row.
Each label can show the product's name, price and a scannable barcode, and — depending on your shop — extras like the maximum retail price (MRP), batch number or expiry date for pharmacy stock.
Why it's useful
- Everything becomes scannable. Print a barcode for any product and the till can scan it — faster and more accurate than searching.
- Prices stay current. Reprint a shelf-edge label whenever a price changes and customers always see the right figure.
- No special hardware needed. A plain A4 sheet of sticker labels and an ordinary printer is enough to get started.
- Scales up. Got a thermal label printer? Send labels straight to it for fast, roll-fed printing.
Printing labels, step by step
-
Open the label tool
Click Print labels under Products in the sidebar. (Or, from the product list, use the Print labels action on a product's row to start with that item already added.)
-
Choose products and quantities
Search for and add the products you want labels for, and set how many labels to print for each. If you just received a delivery, you can pull the received quantities straight from that purchase in one click — handy for labelling a whole shipment.
-
Pick a layout
Choose where the labels print. An A4 sheet lays the labels out in a grid (3, 4 or more across) to match common sticker sheets. A thermal label printer prints them one after another on a roll. Pick the size that matches your stickers.
-
Choose what shows on each label
Tick the details you want printed — typically the name, price and barcode. You can also add the SKU, MRP, or (for pharmacy stock) the batch and expiry. There's a Shelf location option too, which prints where the item belongs — off by default, but worth turning on for stock-room and back-shelf labels so anything picked up finds its way home. See Shelf locations.
-
Preview and print
Check the preview so the labels line up with your sticker sheet. Then print: for an A4 sheet your browser's print dialog opens; for a thermal printer the labels are sent straight to it.
If a product has no barcode, open it in Products and click Generate to create one. Then come back here and print a label — the item is now scannable at the till.
A4 sheets vs thermal label printers
There are two ways to get labels onto your shelves, and you can use either at any time:
| A4 label sheet | Thermal label printer | |
|---|---|---|
| What you need | A sheet of peel-off sticker labels and any ordinary printer. | A dedicated label printer that takes a roll of labels. |
| How it prints | A grid of labels on one page, via your browser's print dialog. | One label after another, fed from the roll. |
| Best for | Getting started, or printing a batch occasionally. | Labelling lots of stock regularly — it's faster and uses no ink. |
Setting up a thermal label printer is covered on the Hardware & printing page.
Tips & best practices
- Print a test sheet first. Run one page on plain paper and hold it against your sticker sheet to check the labels line up before committing a whole sheet.
- Match the layout to your stickers. Sticker sheets come in fixed grids — pick the layout that matches the count on your sheet (for example 24 or 30 per page).
- Label a delivery in one go. Pull quantities from the purchase you just received so the number of labels matches what arrived.
- Scan one before sticking many. Print a single label and scan it at the till to confirm it reads, then print the rest.
Notes & warnings
Check your printer's scaling. If your browser shrinks the page to fit, the labels won't align with the sticker grid. Set printing to 100% / "actual size" with no extra margins.
The price on a label is a snapshot. If you later change a product's price, old labels still show the old figure — reprint them so the shelf matches the till.
Related: Products · Hardware & printing · Batches & expiry · Shelf locations