Shopify & WooCommerce
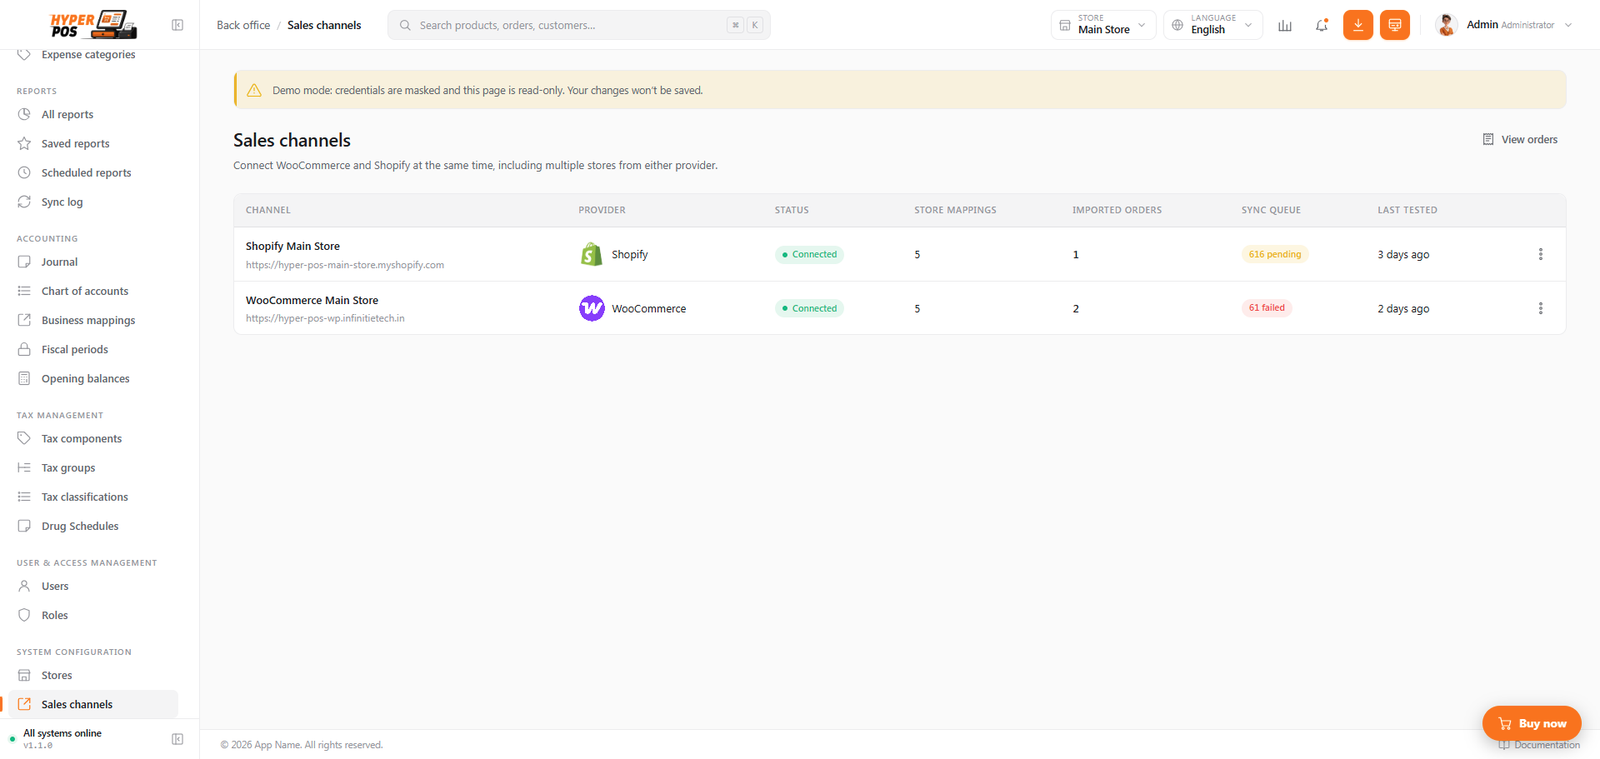
Connect one or more online stores to Hyper POS. Products, customers and available stock can move from POS to each channel, while paid online orders return to POS for reservation, store allocation and fulfilment.
/admin/commerce/connections.How the integration works
You can keep Shopify and WooCommerce connections active at the same time, and add more than one store from either provider. Each connection has its own credentials, switches, store mappings, health, pending work and orders.
| Information | Direction | What happens |
|---|---|---|
| Products, variants, categories, brands and primary image | POS → channel | POS creates and updates the remote catalog. Deleting in POS archives the Shopify product or moves the WooCommerce product to Trash. |
| Available stock | POS → channel | Current available quantity is sent after sales, purchases, adjustments, transfers, reservations and returns. |
| Customers | Both directions | Eligible POS customers are exported; signed customer webhooks can create or update POS customers. |
| Paid online orders | Channel → POS | The order is imported, matched by saved mapping or SKU, and reserved across eligible POS stores. |
| Fulfilment | POS → channel | After staff fulfil a POS allocation, Shopify is fulfilled by line/location or WooCommerce is completed after all allocations finish. |
| Cancellation and refund | Channel → POS | Open reservations are released; fulfilled refunds can create the matching POS return and restock. |
Remote product and stock edits are not imported into POS. A later POS sync can overwrite channel-managed fields. Ordinary counter sales are not copied to Shopify or WooCommerce as orders; only their stock effect is synchronized.
Before connecting a store
- Give products and variants unique SKUs. Saved mappings are the permanent identity, but SKU is needed for safe onboarding and order matching.
- Confirm Hyper POS has a correct public
APP_URL, HTTPS certificate and public/storagelink so providers can reach webhooks and product images. - Run the Laravel scheduler at least every minute. Commerce work is durable in the database, so Redis and a long-running queue worker are not required.
- Create an active POS payment method for online orders. It records money already collected by the provider; it does not charge the shopper again.
- Decide which POS stores will contribute stock and fulfil online orders, and how much safety stock each should keep offline.
Connect Shopify
The current Hyper POS connection uses Shopify's client-credentials flow. Create a merchant-owned app in the Shopify Dev Dashboard for the organization that owns the destination store, release its configuration and install it on that store.
- Create and configure the app
In the Shopify Dev Dashboard, create an app, add a version and select the required Admin API scopes:
write_products
write_inventory
read_locations
write_locations
read_publications
write_publications
write_customers
read_orders
write_merchant_managed_fulfillment_orders
If you will import customers or orders, configure the required protected customer data for customers, orders, name, address, email and phone.
- Release and install the app
Release the app version and install it on the exact Shopify store. If you change scopes later, release the change and approve the new access before retesting.
- Copy the credentials
Open the app's settings and copy its Client ID and Client secret. Keep the secret out of screenshots and support messages.
- Add the connection in POS
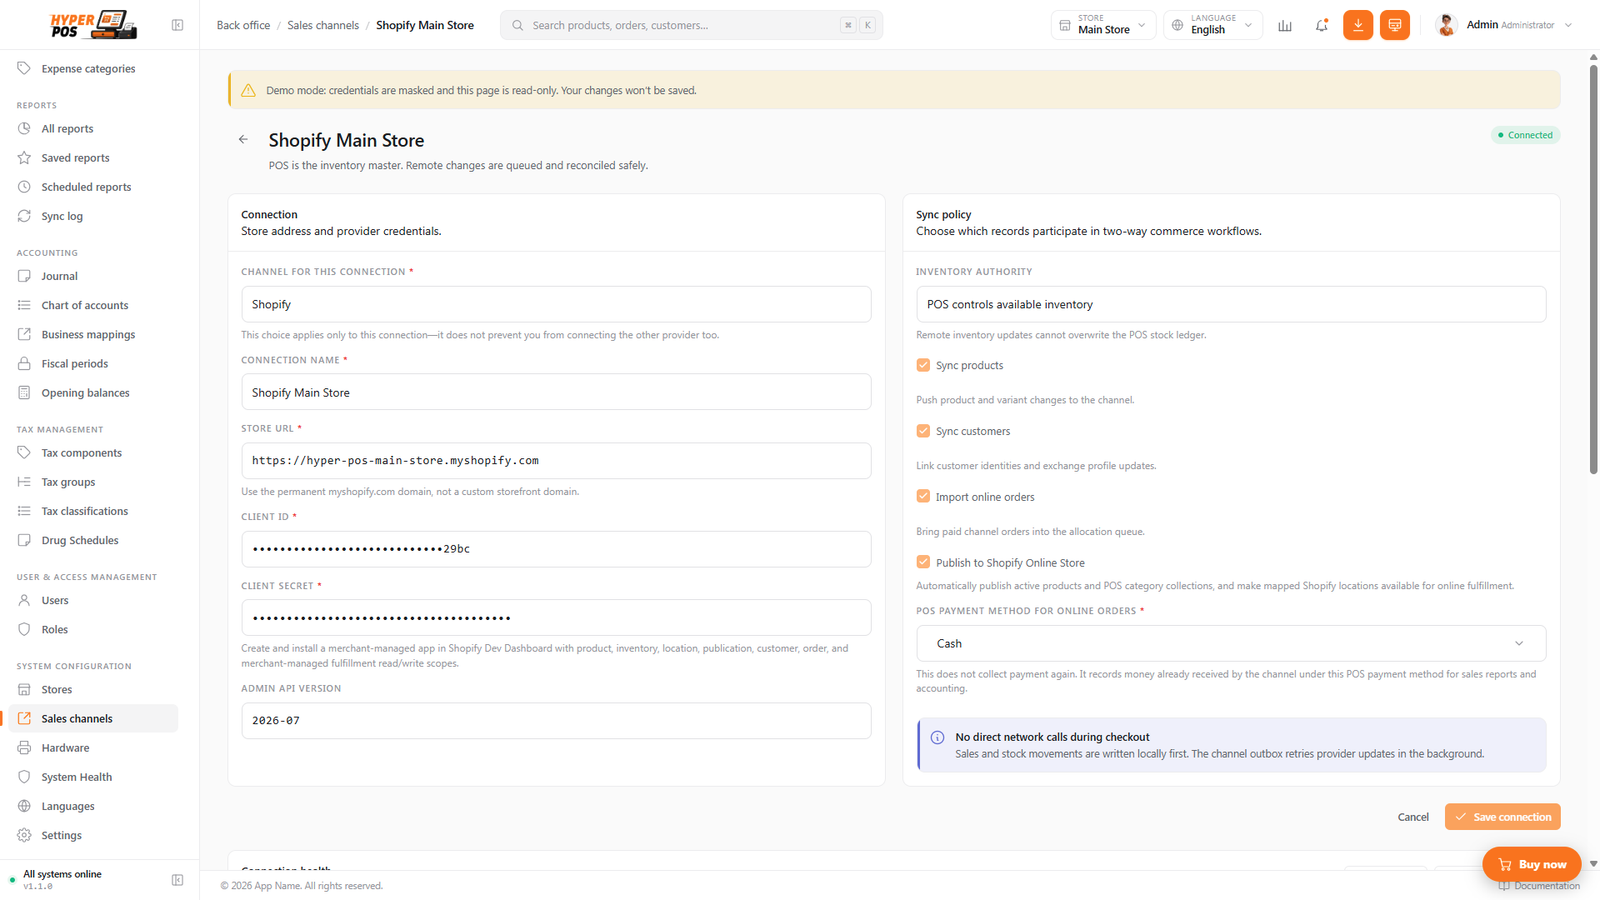
Open Sales channels → Add channel, choose Shopify, enter a helpful name, the permanent
store-name.myshopify.comdomain, Client ID and Client secret. Use the configured Admin API version inYYYY-MMformat. - Choose what to synchronize
Enable products, customers and/or online orders. If importing orders, choose the POS payment method. Enable Publish to Shopify Online Store when active POS products and POS-managed collections should be published automatically.
- Save, test and map locations
Save first, then click Test connection. A successful test obtains a fresh token, reads Shopify locations and registers signed order/customer webhooks. Map every eligible POS store to the correct Shopify location and save.
- Run the first reconciliation
Click Sync now. Keep the page open long enough to confirm work is queued, then let the scheduler drain the catalog, customer and inventory work.
Current Shopify dashboard guidance is available in Shopify's official Dev Dashboard app guide.
myshopify.com domain and credentials from the app installed on that store.What Shopify receives
- Product title, description, active/draft state, options, variants, SKU, barcode, selling price, MRP as compare-at price and stock-tracking state.
- POS brand as Shopify Vendor.
- POS category breadcrumb as Product Type, plus POS-managed collections for the category path. Merchant-created collections are left alone.
- The current primary POS product image. Gallery and variant images are not synchronized in this release.
- Location stock in location mode, or combined stock at a shared Shopify location in aggregate mode.
Connect WooCommerce
- Prepare WooCommerce
Use a current WooCommerce store with a public HTTPS URL. Under WordPress Settings → Permalinks, choose anything except Plain. Under WooCommerce → Settings → Products → Inventory, enable stock management.
- Generate an API key
Go to WooCommerce → Settings → Advanced → REST API, add a key named Hyper POS, select a user allowed to manage products, customers, orders, webhooks and settings, and choose Read/Write. Generate the key and copy the Consumer key and Consumer secret before leaving the page.
- Add the connection in POS
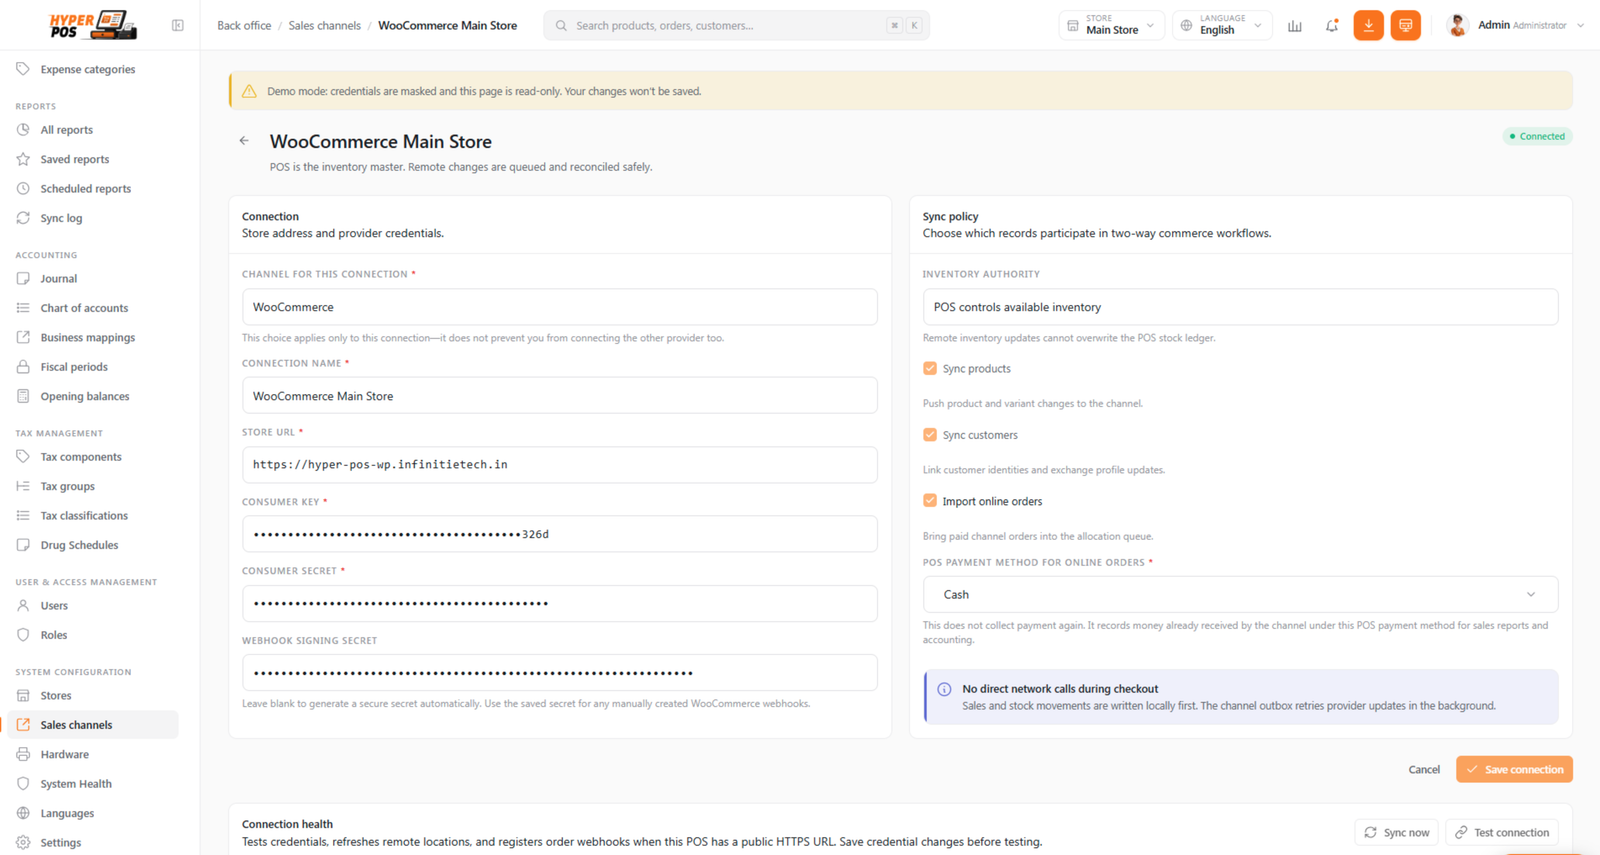
Open Sales channels → Add channel, choose WooCommerce, enter the site root such as
https://shop.example.com—not the/wp-json/wc/v3path—and add the Consumer key and secret. - Set webhook and sync options
Leave the webhook signing secret blank to let POS create one, or enter a strong existing secret. Choose product, customer and order switches and the POS payment method for imported orders.
- Save, test and map stores
Save, then click Test connection. Configure each POS store mapping, inventory switch, order switch, priority and safety stock. WooCommerce has one core stock pool, so enabled POS store quantities are combined.
- Run the first reconciliation
Click Sync now and monitor Pending work, Failed work and Last sync while the scheduler processes it.
See WooCommerce's official REST API key guide and webhook settings guide if the provider's labels move.
If WooCommerce webhooks are not registered automatically
Open the saved connection in POS and copy its Webhook URL and signing secret. In WooCommerce, go to Settings → Advanced → Webhooks and create one active webhook for each topic below, using the exact same delivery URL and secret:
order.createdorder.updatedorder.deletedcustomer.createdcustomer.updated
Map POS stores and stock
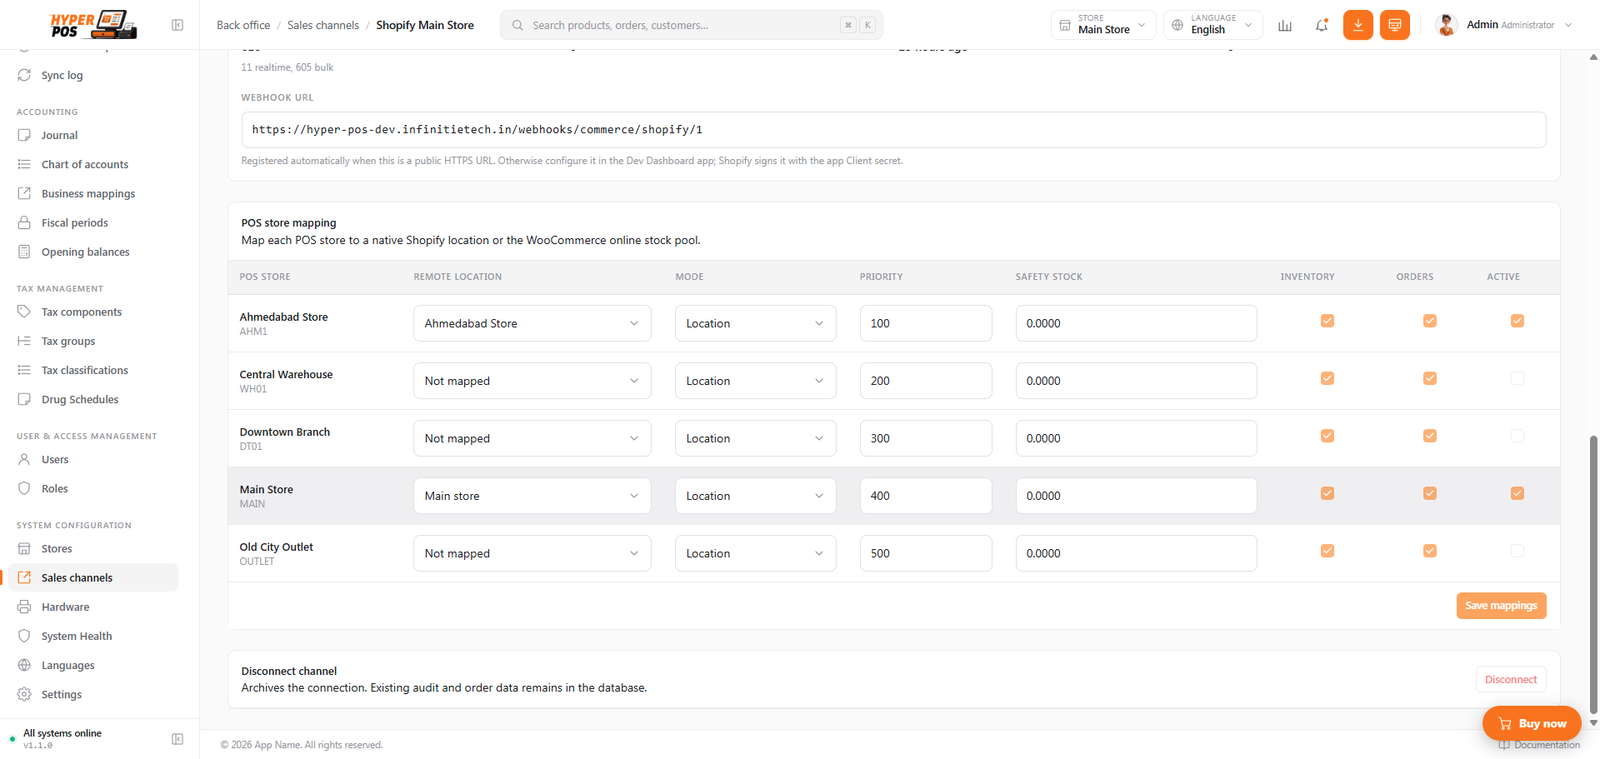
After testing a connection, its store-mapping table appears. For each POS store, choose the remote location or online pool and set:
| Field | Meaning |
|---|---|
| Mode | Location sends one POS store to one Shopify location; Aggregate combines mappings that share a location; Disabled sends no inventory. |
| Priority | The lowest number is considered first when a paid online order is allocated. |
| Safety stock | Quantity withheld from online availability. |
| Inventory | Allows this POS store to contribute availability. |
| Orders | Allows this POS store to reserve and fulfil channel orders. |
| Active | Master switch for this mapping. |
Online availability is calculated as on hand − reserved − safety stock, never below zero. The quantity sent is absolute—not an incremental adjustment.
Sync now, health and retries
- Test connection checks credentials, refreshes remote locations and attempts webhook registration.
- Sync now queues a full current reconciliation. It does not pull remote products or remote stock into POS.
- Pending work is safe database-backed work waiting for its due time or the scheduler.
- Failed work needs its displayed cause fixed—credentials, permissions, mapping, public image URL or provider availability—before retrying.
- A provider outage never rolls back a completed local sale or stock movement. The work remains queued and retries with increasing delay.
After correcting a remotely deleted product or stale mapping, click Sync now. The manual run force-checks current POS products so missing remote records can be recreated and remapped.
Troubleshooting checklist
| Problem | Check |
|---|---|
| Shopify authentication or missing-scope error | Confirm the app belongs to and is installed on the exact store, the released version includes all required scopes, new scopes were approved, and saved credentials were retested. |
| Protected customer data error | Configure customers/orders plus the required name, address, email and phone fields in the Shopify app, then release and retest. |
| WooCommerce cannot connect | Check HTTPS, site-root URL, non-Plain permalinks, /wp-json/wc/v3 access, Read/Write key, associated user permissions and security/firewall plugins. |
| Products appear but stock is zero | Check active store mappings, Inventory switch, correct remote location, safety stock, POS on-hand/reserved quantities and pending/failed inventory work. |
| Product image is missing | Open the POS image URL in a signed-out browser. Confirm APP_URL, HTTPS and the storage link are public. |
| Orders do not arrive | Confirm Import online orders is enabled, the order is paid, webhook is active, URL/secret are exact, provider delivery succeeded and the scheduler is running. |
| Pending count does not fall | Check cron heartbeat and whether the work is due. Do not delete pending rows merely to clear the number. |
Credential and recovery safety
- Never place Client secrets, Consumer secrets, tokens or webhook secrets in screenshots, URLs, logs or support tickets.
- Back up the installation's
APP_KEYsecurely with the database. Connection credentials and sensitive payloads are encrypted with it. - Disconnecting a POS connection removes local access to that integration; it does not delete the remote store. Verify its effect before confirming.
- Use one normal Laravel scheduler entry. Do not add overlapping commerce workers unless your hosting arrangement has been reviewed.
Related: Channel orders · Cron job setup · Products · Inventory · Customers