Customers
A customer record is who's buying from you — their name and contact details, the perks they get, and what (if anything) they owe you. Keeping customers in the system unlocks discounts, credit (pay later), and a full history of what each person has bought.
/admin/customers.Overview
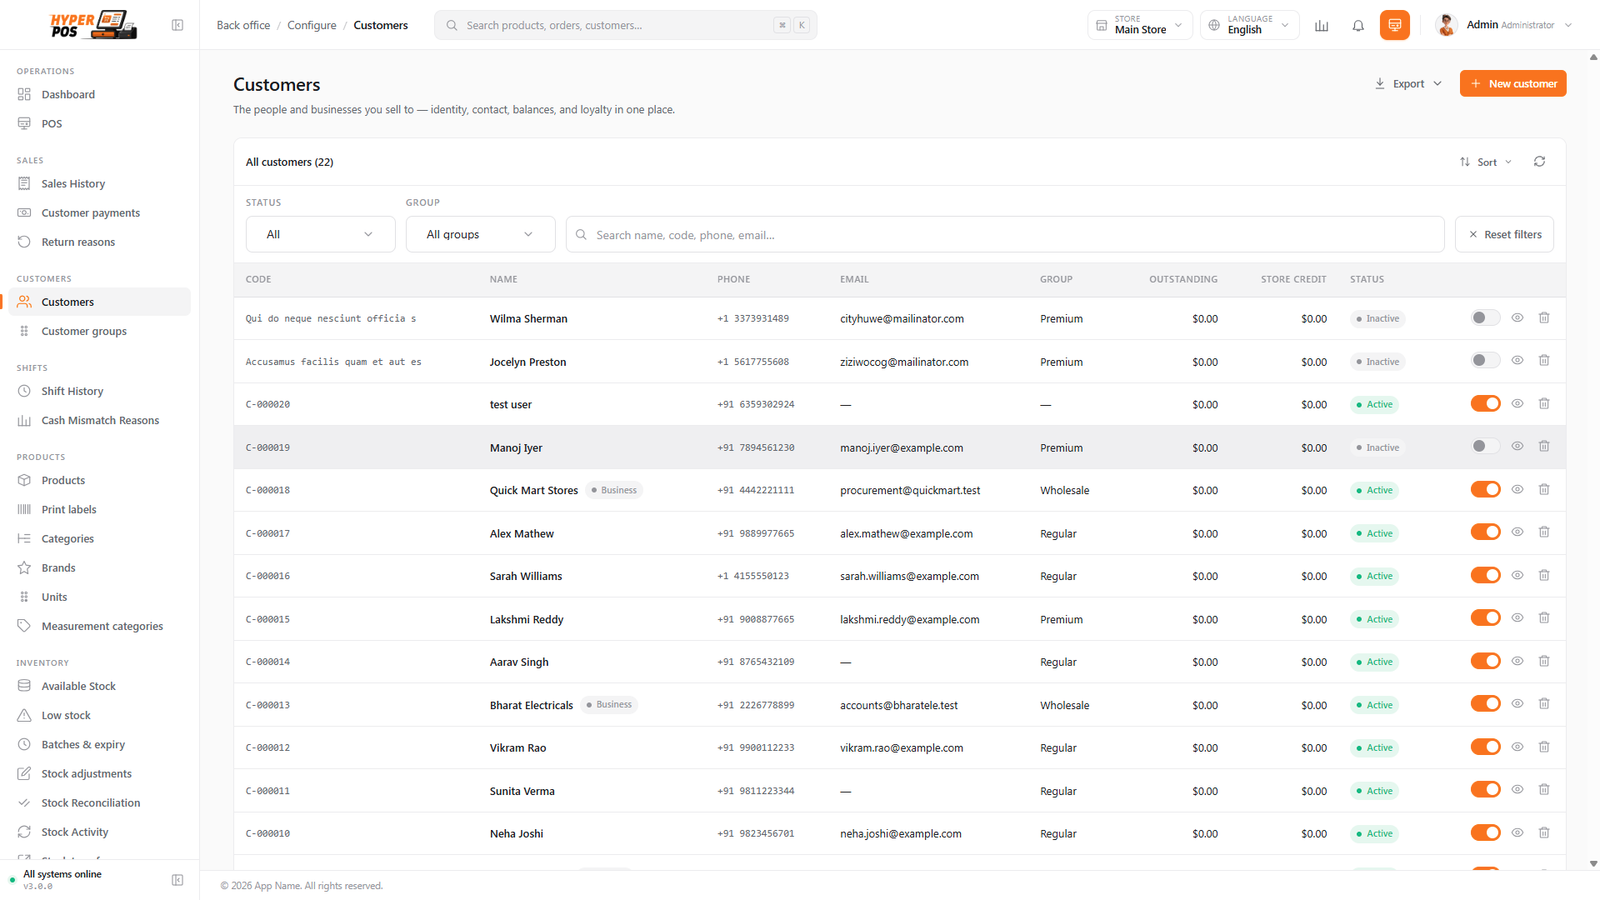
Most sales are to "Walk-in" customers — anonymous, quick, no record needed. You only add a customer when it helps: to give them a regular discount, let them buy on credit, or build up their purchase history and loyalty. The Customers screen is the list of everyone you've saved, with their contact details, group, and balances.
Each customer can have a group (like Wholesale or Premium) that sets shared pricing, a credit limit that lets them pay later, an outstanding balance showing what they currently owe, and a separate store-credit balance when the business is holding an overpayment for them.
Why it's useful
- Reward regulars. Set a default discount per customer, or per group, so it applies automatically at checkout.
- Offer credit. Trusted customers can take goods now and pay later, up to a limit you set.
- Know what they owe. Each record shows a live outstanding balance, so nobody slips through the cracks.
- Keep their history. Once a sale is attached to a customer, it appears in their purchase history for easy reference and returns.
Adding a customer, step by step
-
Open Customers and click New
Go to Customers in the sidebar, then click the New customer button at the top of the list.
-
Fill in the essentials
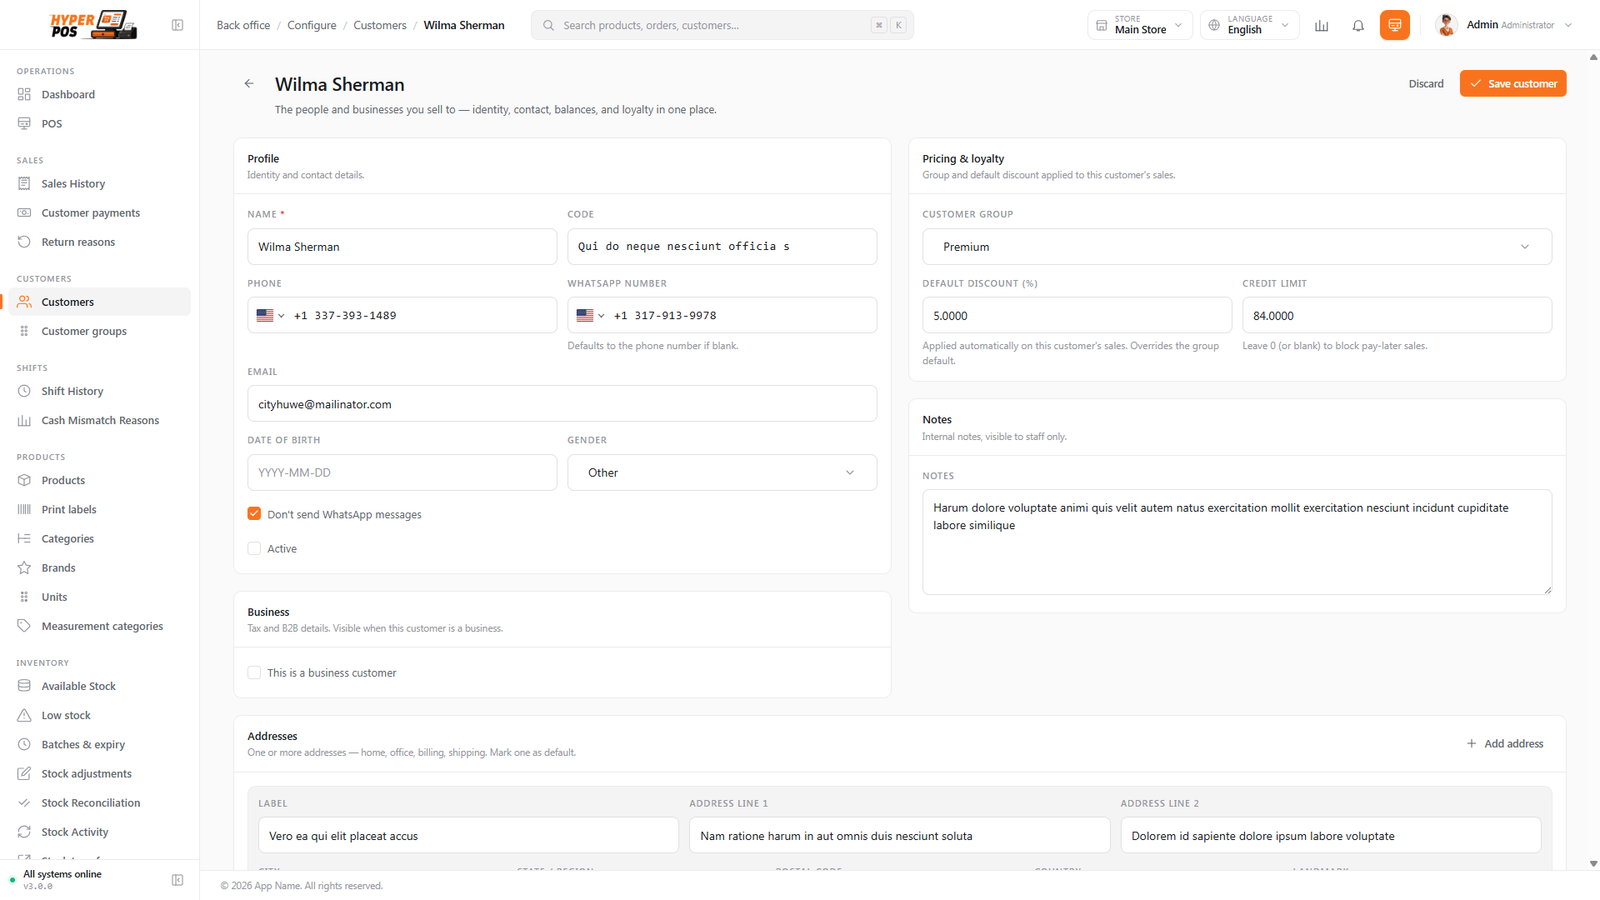
Only the name is required. Add a phone number and email if you have them — these help you find the customer again and send receipts. The phone field shows a country flag and checks the number for you.
-
Choose a group (optional)
Pick a customer group if this person belongs to one — for example Wholesale or Premium. The group's discount applies automatically on their sales. See Customer groups below.
-
Allow credit (optional)
If you want this customer to be able to pay later, set a credit limit. Leave it at zero to keep them cash-only. See Allowing credit.
-
Save
Click Save. The customer now appears in the list and can be picked at the POS screen during a sale.
You don't have to come here first. On the POS screen, the customer picker has a New customer button — just name and phone — so you can save someone mid-sale and complete their details later.
Editing a customer
To change someone's details, click their row in the list to open the form, make your changes, and save. You can update contact details, switch their group, adjust their discount or credit limit, and add private staff notes that only your team sees.
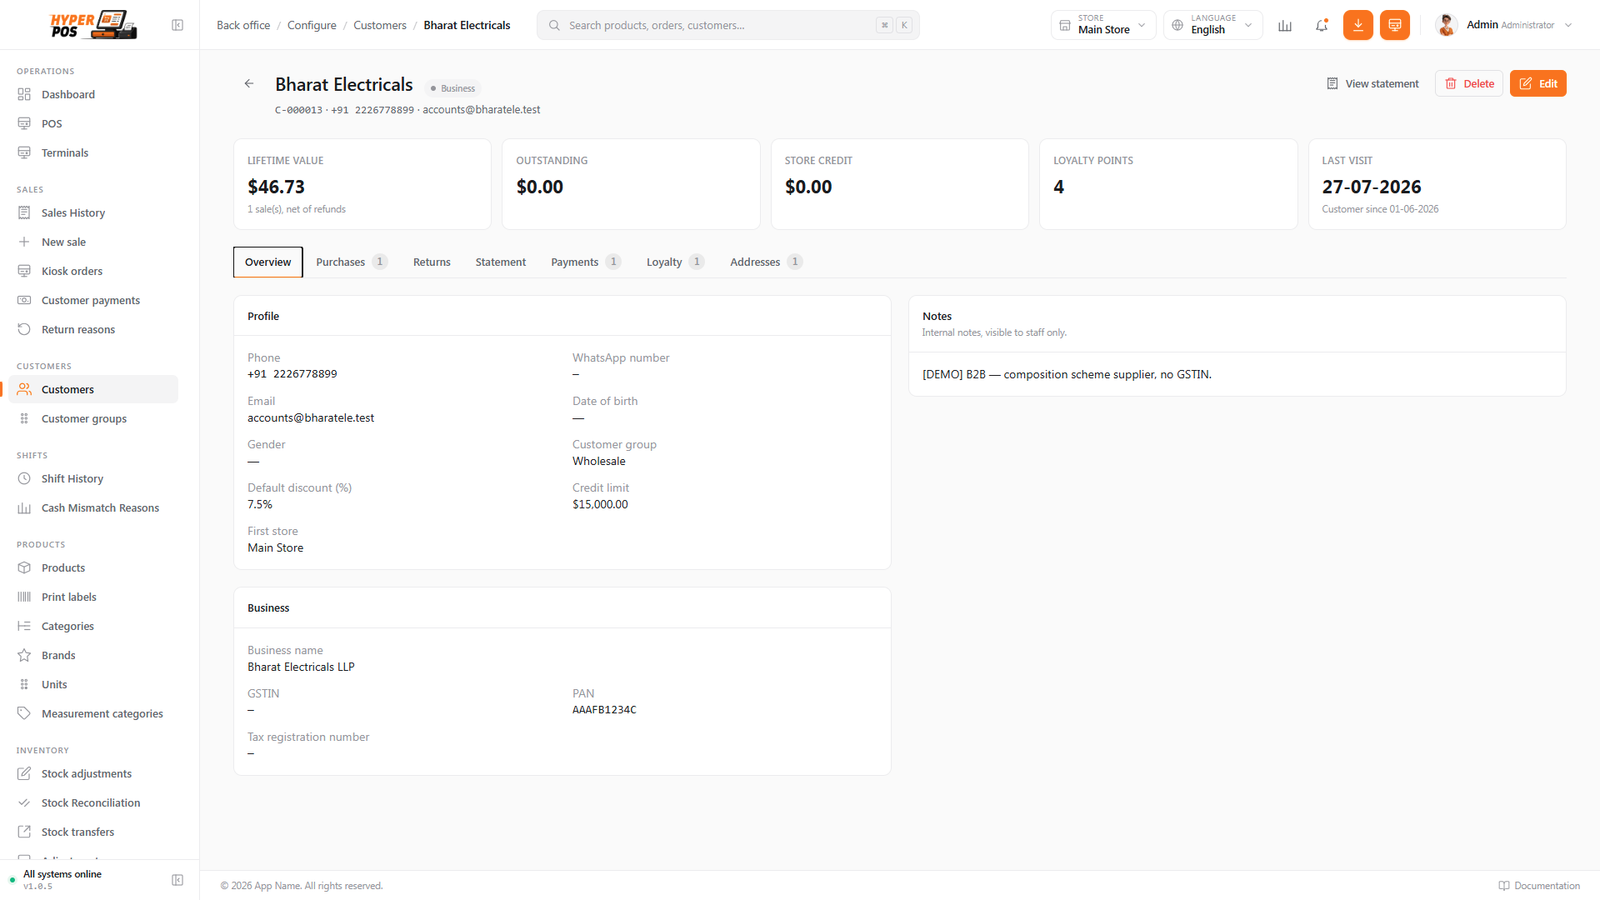
Everything about one customer, in one place
A customer's page isn't just a form — it's their whole story with your shop, split into tabs so you're never scrolling through things you didn't ask for. Click a tab and only that part loads; the page never reloads from scratch.
| Tab | What it shows |
|---|---|
| Overview | Their profile and contact details, group, discount, credit limit, current outstanding balance and available store credit. |
| Addresses | As many addresses as you need — home, office, billing, delivery — with one marked as the default. |
| Purchases | Every sale this customer has made, newest first. Click any row to open the full sale. |
| Payments | Money they've paid you against their account, and which invoices each payment settled. See Customer payments. |
| Returns | Anything this customer has brought back. See Returns & refunds. |
| Statement | A running-balance ledger — invoices, payments, store-credit movements and returns in date order. Choose a date range to print it or send it through WhatsApp. |
| Loyalty | Their points balance, what it's worth, and every point earned or spent. See Loyalty points. |
Each tab has its own web address, so you can bookmark a customer's statement or send a colleague a link that opens straight on the right tab. Tabs you don't have permission to see simply aren't shown. Suppliers work exactly the same way — see Suppliers — so everyone you do business with is managed the same way, whether they sell to you or buy from you.
Customer groups
A customer group is a label you put on a set of customers so they share the same perks. Instead of setting a discount on every person one by one, you set it once on the group, and every member inherits it.
A group can:
- Set a default discount — for example, a Wholesale group might give 15% off every sale to its members.
- Boost loyalty earning — a Premium group can earn points faster (or a trade group earn none). See Loyalty points.
- Group your reports — so you can see how much your wholesale customers spend versus retail.
A few common groups come ready to use (Walk-in, Regular, Wholesale, Premium), and you can rename them or add your own. When a customer in a group is attached to a sale, the group's discount appears automatically as a discount line on that sale — see Discounts & pricing. Manage groups under Customers → Customer groups.
Group discounts follow the group
A customer's own discount field is an override, not a copy. Leave it blank and the customer simply follows whatever their group gives — the field shows the group's rate as grey placeholder text so you can see what they'll get.
That's the point of it: raise the Wholesale group from 15% to 20% and every member on the group rate gets 20% at the till from the next sale onwards. You don't have to touch a single customer record.
- Blank — follow the group. The rate changes whenever the group's does.
- A number you type — that customer's own rate, used instead of the group's (not on top of it). A customer on 5% in a 15% group gets 5%.
- Zero — a deliberate "no discount for this person", even if their group gives one. An explicit zero is meaningful; blank is not.
If you've set an override and want to go back, click Follow the group instead under the field and it clears. The rate is worked out fresh at checkout, so it's identical on the POS screen, a back-office sale and a kiosk order.
Allowing credit & the outstanding balance
"Credit" here means letting a trusted customer take goods now and pay later. To allow it, give the customer a credit limit greater than zero. At checkout, a sale attached to that customer can then be left partly or fully unpaid.
Whatever they don't pay becomes their outstanding balance — the running total of what they owe you. You'll see it on their record and in the customer list:
| Term | What it means |
|---|---|
| Credit limit | The most a customer is allowed to owe at any one time. Zero means no credit — they must pay in full. |
| Outstanding balance | What the customer currently owes from unpaid (credit) sales. Goes up when they buy on credit, down when they pay. |
When a customer pays off some or all of what they owe, you record it as a customer payment, and their outstanding balance drops accordingly. If they pay more than they owe, the surplus becomes separate store credit that can be used at a future checkout.
Rewarding regulars with points
If you switch the loyalty programme on, every sale with a customer attached quietly earns them points, which they can later spend as money off at the counter. Their balance and full points history live on the Loyalty tab of their record, and you can add or remove points by hand with a reason.
It's off until you turn it on, and it's set up once for the whole business under Settings → Loyalty points. The full walkthrough is in Loyalty points.
Importing & exporting
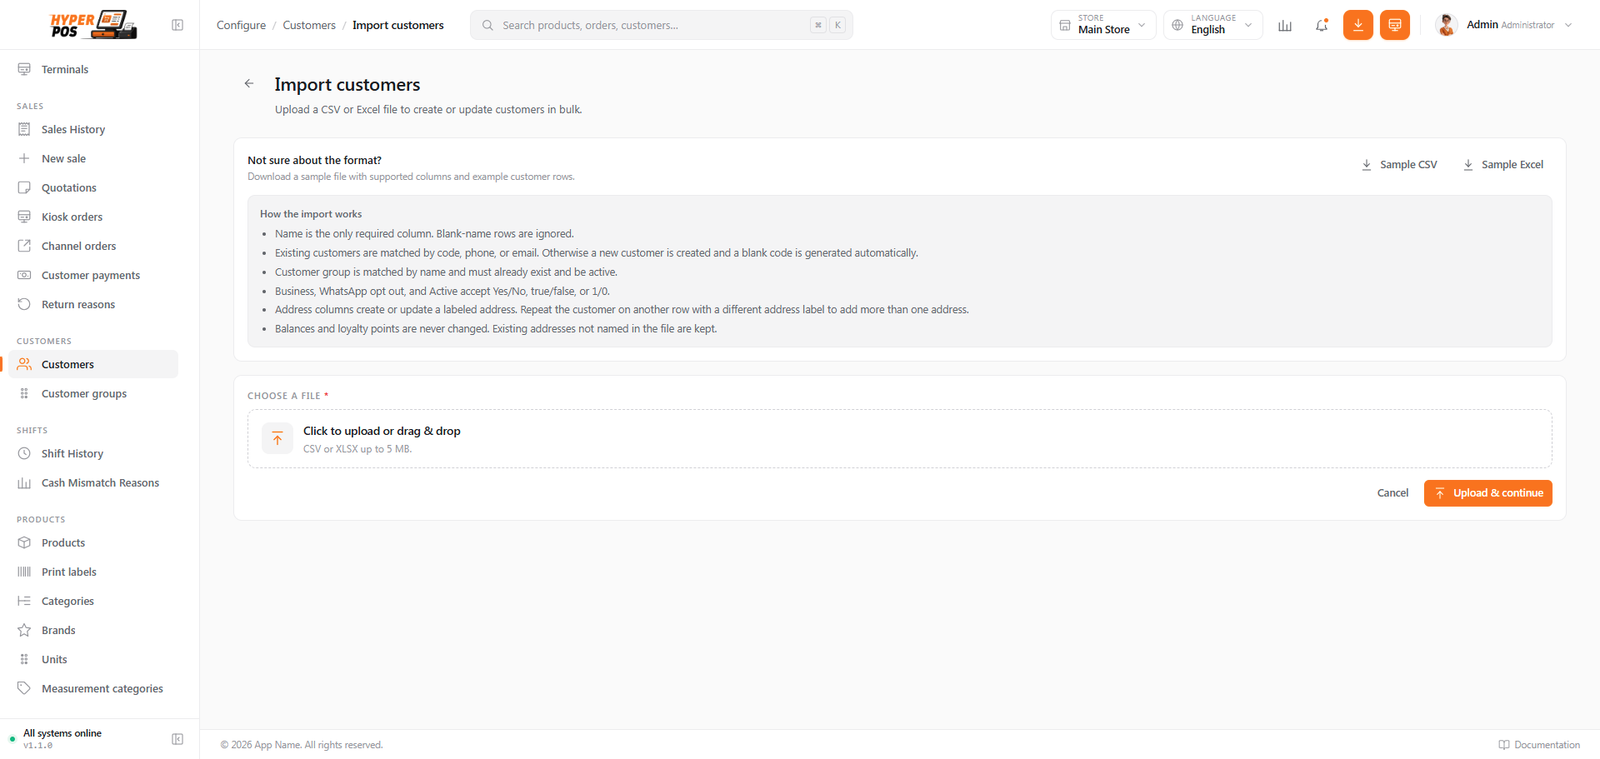
The Customers list can export accessible records as CSV or Excel and import a prepared spreadsheet with preview, validation and safe matching.
- Download the CSV or Excel sample
Open Customers → Import and download the sample in your preferred format. Name is required; include a customer code, email or phone whenever possible so future imports can identify the same person.
- Fill in customer and address details
Add the profile fields you want to maintain. Repeating one customer on separate rows with different address labels can add multiple addresses without removing unrelated saved addresses.
- Upload and match columns
Common headings are suggested automatically. Review every mapping and the sample values before continuing. Unmapped fields are left unchanged on existing customers.
- Review validation
New records, updates and problem rows are shown before import. Unknown or inactive groups are reported; the importer does not silently create or guess a group.
- Confirm the import
New customers receive an automatic code when blank. Existing customers can match by customer code, email or normalized phone. The result lists created, updated and skipped rows.
If code, email and phone point to different existing customers, the row is reported as a conflict instead of merging accounts. Import only changes mapped profile/address fields; sales, balances, credit history, loyalty and other unmapped addresses remain intact.
Tips & best practices
- Add a phone number. It's the fastest way to find a returning customer at the counter, and lets you send receipts.
- Use groups for shared perks. Set the wholesale discount once on the group rather than on each customer.
- Only allow credit you can chase. A credit limit is a promise — set it to an amount you're comfortable being owed.
- Export before big changes. A quick export is a free safety net before a bulk import.
Notes & warnings
Only customers can buy on credit. A "Walk-in" sale must always be paid in full. To let someone pay later, attach a saved customer with a credit limit to the sale before taking payment.
You can't delete a customer who still owes you. Settle their outstanding balance (or any store credit they hold) first — the system will tell you what's blocking the delete.
Related: Customer payments · Loyalty points · Quotations · Shopify & WooCommerce · Sales history